


Pipeline 101
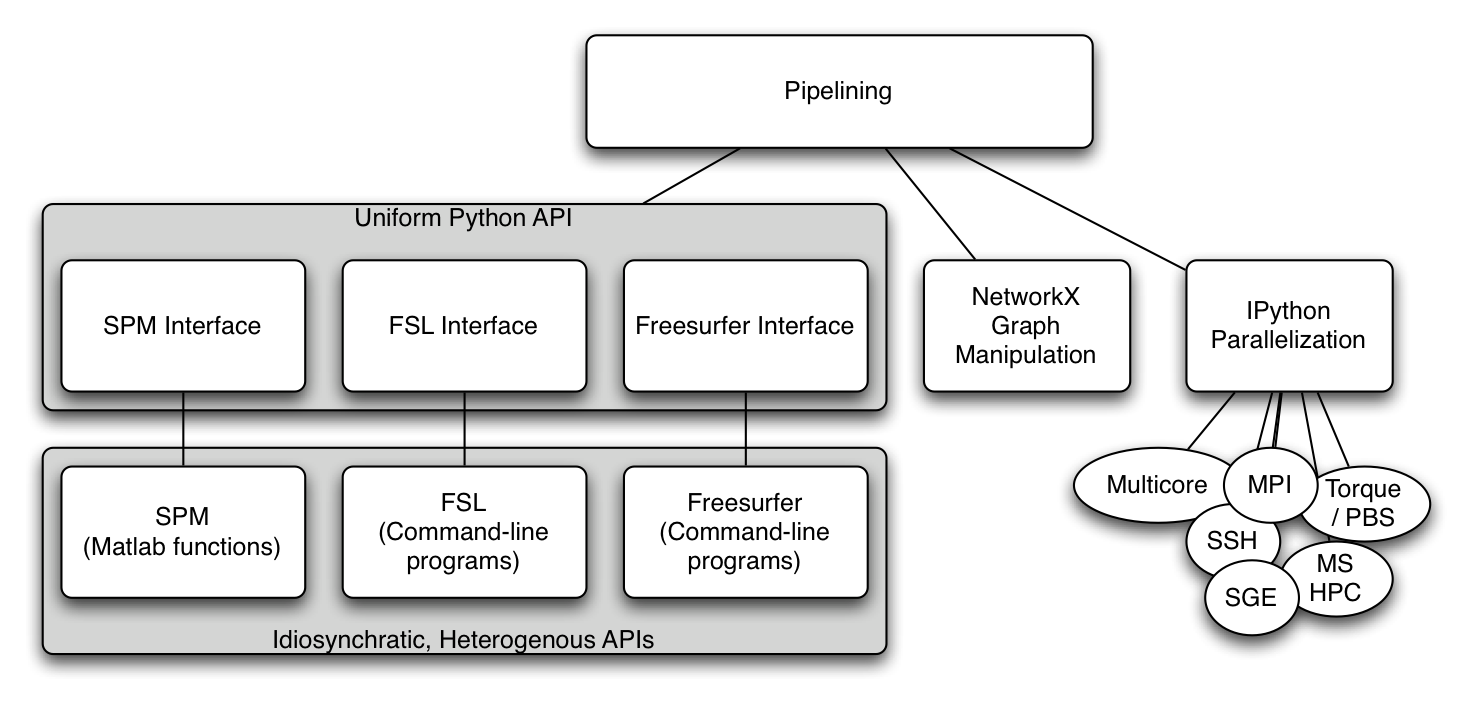
A workflow or pipeline is built by connecting processes or nodes to each other. In the context of nipype, every interface can be treated as a pipeline node having defined inputs and outputs. Creating a workflow then is a matter of connecting appropriate outputs to inputs. Currently, workflows are limited to being directional and cannot have any loops, thereby creating an ordering to data flow. The following nipype component architecture might help understanding some of the tutorials presented here.
My first pipeline
Although the most trivial workflow consists of a single node, we will create a workflow with two nodes: a realign node that will send the realigned functional data to a smoothing node. It is important to note that setting up a workflow is separate from executing it.
1. Import appropriate modules
import nipype.interfaces.spm as spm         # the spm interfaces
import nipype.pipeline.engine as pe         # the workflow and node wrappers
2. Define nodes
Here we take instances of interfaces and make them pipeline compatible by
wrapping them with pipeline specific elements. To determine the inputs and outputs
of a given interface, please see Tutorial : Interfaces. Let’s
start with defining a realign node using the interface
nipype.interfaces.spm.Realign
realigner = pe.Node(interface=spm.Realign(), name='realign')
realigner.inputs.in_files = 'somefuncrun.nii'
realigner.inputs.register_to_mean = True
This would be equivalent to:
realigner = pe.Node(interface=spm.Realign(infile='somefuncrun.nii',
                                          register_to_mean = True),
                    name='realign')
In Pythonic terms, this is saying that interface option in Node accepts an instance of an interface. The inputs to this interface can be set either later or while initializing the interface.
Note
In the above example, ‘somefuncrun.nii’ has to exist, otherwise the commands won’t work. A node will check if appropriate inputs are being supplied.
Similar to the realigner node, we now set up a smoothing node.
smoother = pe.Node(interface=spm.Smooth(fwhm=6), name='smooth')
Now we have two nodes with their inputs defined. Note that we have not defined an input file for the smoothing node. This will be done by connecting the realigner to the smoother in step 5.
3. Creating and configuring a workflow
Here we create an instance of a workflow and indicate that it should operate in the current directory.
workflow = pe.Workflow(name='preproc')
workflow.base_dir = '.'
4. Adding nodes to workflows (optional)
If nodes are going to be connected (see step 5), this step is not necessary. However, if you would like to run a node by itself without connecting it to any other node, then you need to add it to the workflow. For adding nodes, order of nodes is not important.
workflow.add_nodes([smoother, realigner])
This results in a workflow containing two isolated nodes:

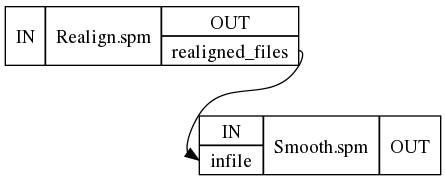
5. Connecting nodes to each other
We want to connect the output produced by the node realignment to the input of the node smoothing. This is done as follows.
workflow.connect(realigner, 'realigned_files', smoother, 'in_files')
Although not shown here, the following notation can be used to connect multiple outputs from one node to multiple inputs (see step 7 below).
workflow.connect([(realigner, smoother, [('realigned_files', 'in_files')])])
This results in a workflow containing two connected nodes:
6. Visualizing the workflow
The workflow is represented as a directed acyclic graph (DAG) and one can visualize this using the following command. In fact, the pictures above were generated using this.
workflow.write_graph()
This creates two files graph.dot and graph_detailed.dot and if graphviz is installed on your system it automatically converts it to png files. If graphviz is not installed you can take the dot files and load them in a graphviz visualizer elsewhere. You can specify how detailed the graph is going to be, by using “graph2use” argument which takes the following options:
- hierarchical - creates a graph showing all embedded workflows (default)
- orig - creates a top level graph without expanding internal workflow nodes
- flat - expands workflow nodes recursively
- exec - expands workflows to depict iterables (be careful - can generate really large graphs)
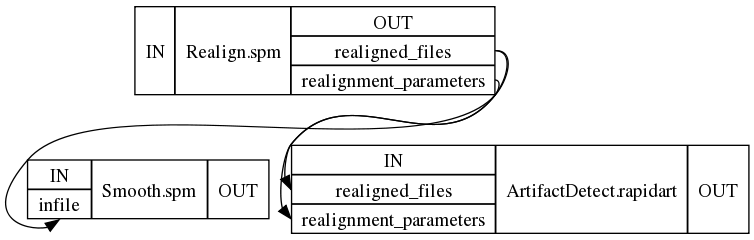
7. Extend it
Now that you have seen a basic pipeline let’s add another node to the above pipeline.
import nipype.algorithms.rapidart as ra
artdetect = pe.Node(interface=ra.ArtifactDetect(), name='artdetect')
artdetect.inputs.use_differences  = [True, False]
art.inputs.use_norm = True
art.inputs.norm_threshold = 0.5
art.inputs.zintensity_threshold = 3
workflow.connect([(realigner, artdetect,
                   [('realigned_files', 'realigned_files'),
                    ('realignment_parameters','realignment_parameters')]
                  )])
Note
a) How an alternative form of connect was used to connect multiple output fields from the realign node to corresponding input fields of the artifact detection node.
b) The current visualization only shows connected input and output ports. It does not show all the parameters that you have set for a node.
This results in
8. Execute the workflow
Assuming that somefuncrun.nii is actually a file or you’ve replaced it with an appropriate one, you can run the pipeline with:
workflow.run()
This should create a folder called preproc in your current directory, inside which are three folders: realign, smooth and artdetect (the names of the nodes). The outputs of these routines are in these folders.
- pipeline
- Connected series of processes (processes can be run parallel and or sequential)
- workflow
- (kind of synonymous to pipeline) = hosting the nodes
- node
- = switching-point within a pipeline, you can give it a name (in the above example e.g. realigner), a node usually requires an or several inputs and will produce an or several outputs
- interface
- = specific software (e.g. FSL, SPM ...) are wrapped in interfaces, within a node instances of an interface can be run
- modules
- for each interface the according modules have to be imported in the usual pythonic manner